2016
April
Standard

WebVirtMgr@CentOS 6 KVM libvirtd

Install WebVirtMgr @ Centos 6:

# yum -y install http://dl.fedoraproject.org/pub/epel/6/x86_64/epel-release-6-8.noarch.rpm
# yum -y install git python-pip libvirt-python libxml2-python python-websockify supervisor nginx
# git clone git://github.com/retspen/webvirtmgr.git
# cd webvirtmgr
# pip install -r requirements.txt
# ./manage.py syncdb
# ./manage.py collectstatic


##########Adding additional superusers

# ./manage.py createsuperuser

######
# cd ..
# mv webvirtmgr /var/www/
####NGINX VIRTULKA HOST:

# cat /etc/nginx/conf.d/webvirtmgr.conf 
server {
    listen       6699;
    server_name  kvm.belomor.nl:6699;
    

    location /static/ {
root /var/www/webvirtmgr/webvirtmgr;        
expires max;
    }

    location / {
        proxy_pass http://127.0.0.1:8000;
        proxy_set_header X-Real-IP $remote_addr;
        proxy_set_header X-Forwarded-for $proxy_add_x_forwarded_for;
        proxy_set_header Host $host:$server_port;
        proxy_set_header X-Forwarded-Proto $scheme;
        proxy_connect_timeout 600;
        proxy_read_timeout 600;
        proxy_send_timeout 600;
        client_max_body_size 1024M; # Set higher depending on your needs 
    }
}

###Update SELinux policy

# setsebool httpd_can_network_connect true 

####SET OWNER nginx
# chown -R nginx:nginx /var/www/webvirtmgr


#####################

Continue Reading →

more
Standard

WordPress backup & rsync to remote Debian host

script:

#!/bin/bash

#this script is: /home/gus/backup.sh
#backup are in: /data/backups

#set date of backup
sysdate=`date '+%Y-%b-%d-%H:%M'`
#set prefix for backup type
prefix='site-to-backup-data'
#make tar.gz archive backup of WP dir....
tar -zcvf /data/backups/${prefix}_$(date +%Y-%b-%d-%H:%M).tar.gz /data/site-to-backup/site-to-backupaz

#set prefix for mysq backup
prefix='site-to-backup-mysql'
#set user of mysql
MUSER='user'
#set passwors of mysl user
MPASS='passwd'
#mysq dump....
mysqldump -u $MUSER -p$MPASS --databases db_name --single-transaction | gzip -9 > /data/backups/${prefix}_$(date +%Y-%b-%d-%H:%M).sql.gz

#ROTATION
#delete old mysql backups (keep always the 10 most recent files)
cd /data/backups
ls -A1t | grep mysql | tail -n +11 | xargs rm -rf

#delete old site backups (keep always the 10 most recent files)
ls -A1t | grep data | tail -n +11 | xargs rm -rf
#echo date
echo "Full Backup Done@"$sysdate
<!--more-->
###RSYNC BACKUP STEPS:

##for backup on remote server was chosen 'gus-backup' user!

# ssh-keygen -f ~/.ssh/id_rsa -q -P ""

# scp -P NNNN /root/.ssh/id_rsa.pub [email protected]:/home/gus-backup/rsync-key.pub

#####On remote machine login via gus-backup!

$ if [ ! -d .ssh ]; then mkdir .ssh ; chmod 700 .ssh ; fi 
$ mv rsync-key.pub .ssh/ 
$ cd .ssh/ 
$ if [ ! -f authorized_keys ]; then touch authorized_keys ; chmod 600 authorized_keys ; fi 
$ cat rsync-key.pub >> authorized_keys 

######Check ssh login via key from source machine passwordless!

# ssh -p NNNN [email protected]

#check rsync relation from source server!

###########
# rsync --progress -e 'ssh -p NNNN' -avzp /data/backups [email protected]:/home/gus-backup/
###########

##############cron job:

# crontab -l
###START AT 01:30 AM EVERY DAY
#30 1 * * * /home/gus/backup.sh
###START AT 02:30 AM EVERY DAY
30 2 * * * rsync --progress -e 'ssh -p NNNN' -avzp /data/backups [email protected]:/home/gus-backup/
####EVERY MIN
*/1 * * * * /home/gus/backup.sh

Continue Reading →

more
Standard

Migrate KVM Guest running on LVM to another KVM Hypervizor.

Sharing tutorial how I have migrated vm.belomor.nl…

**///////////////// Create the key pair:

# ssh-keygen
Generating public/private rsa key pair.
Enter file in which to save the key (/root/.ssh/id_rsa): 
Enter passphrase (empty for no passphrase): 
Enter same passphrase again: 
Your identification has been saved in /root/.ssh/id_rsa.
Your public key has been saved in /root/.ssh/id_rsa.pub.
The key fingerprint is:
02:39:0b:41:de:2e:1c:65:dd:54:82:5a:64:68:1f:e0 root@source-kvm
The key's randomart image is:
+--[ RSA 2048]----+
| .o +=o+o..      |
| . *oo= ..       |
|  +.E+ .         |
| . +.+.          |
|  o o . S        |
|   .   .         |
|                 |
|                 |
|                 |
+-----------------+

**/////////////////Share pubkey between the two hosts from source server

# ssh-copy-id root@destination-kvm
root@destination-kvm's password: 
Now try logging into the machine, with "ssh 'root@destination-kvm'", and check in:

  .ssh/authorized_keys

to make sure we haven’t added extra keys that you weren’t expecting.

**/////////////////Create Logical Volume on target:

# lvcreate -L 50G -n vm.belomor.nl vol_group_vm</strong>
  Logical volume "vm.belomor.nl" created

**/////////////////Pipe the volume to the target host:

# dd if=/dev/vol_group_vm/vm.belomor.nl | ssh root@destination-kvm 'dd of=/dev/vol_group_vm/vm.belomor.nl'

104857600+0 records in
104857600+0 records out
53687091200 bytes (54 GB) copied, 2632.79 s, 20.4 MB/s

**/////////////////Cofee Brake :)
**/////////////////Dump the xml definition.

# virsh dumpxml vm.belomor.nl > vm.belomor.nl_dump.xml

**/////////////////Transfer xml-file:

# scp vm.belomor.nl_dump.xml root@destination-kvm:/root/
vm.belomor.nl_dump.xml

**/////////////////Define the machine on target:

# virsh define vm.belomor.nl_dump.xml

Domain vm.belomor.nl defined from vm.belomor.nl_dump.xml

**/////////////////Start transferred machine:

# virsh start vm.belomor.nl

#######################AFTER SUCCESSFUL MIGRATION YOU CAN PROCEED WITH CLEAN UP PROCEDURE:

# virsh undefine vm.belomor.nl
Domain vm.belomor.nl has been undefined

# lvremove /dev/vol_group_vm/vm.belomor.nl 
Do you really want to remove active logical volume vm.belomor.nl? [y/n]: y
  Logical volume "vm.belomor.nl" successfully removed

Done...
# date
Tue Apr  5 13:56:10 AZT 2016

[email protected]; [email protected]

more
Standard

Linux partition space alert script

A simple bash script to send email if /local mount point is used more than 90%:

# cat /root/disk.sh 
#!/bin/bash
CURRENT=$(df /local | grep /local | awk '{ print $5}' | sed 's/%//g')
THRESHOLD=90

if [ "$CURRENT" -gt "$THRESHOLD" ] ; then
    mail -s '!!!Disk Space Alert ORACLE oracle.belomor.nl!!!' [email protected] -c [email protected] -c [email protected] -c [email protected] << EOF
Oracle partition remaining free space is critically low. Used: $CURRENT%
EOF
fi

##############

hourly run script:

# crontab -l | grep disk
@hourly /root/disk.sh
# date

Fri Apr  1 14:31:27 AZT 2016

more
moto-x-2014-2nd-gen-bootloader-unlock
Standard

Unlock Bootloader & Root Verizon Moto XT1096 Android 5.1

Recently I have purchased Moto XT1096 Verizon.
Fortunately, at the beginning of this year, Verizon delivers a surprise.
They allow its Moto X 2nd Gen device to be unlocked, which means the XT1096 now officially supported by Motorola unlock program.
This is very good news because, once the phone’s bootloader is unlocked, we can easily get a root even flash the custom ROMs,
and it’s free of charge, there’s no need to purchase a license.
Here is small tutorial how to gain root on Verizon Moto XT1096…
As usual we need adb & fastboot installed on PC and actually drives for fastboot mode was found automatically in my Win7 x64 machine…
So you do not need to waste a time to search and install Motorola drivers…

First of all we need to enable Developer Option, USB Debugging and check ‘Enable OEM Unlock’ in Developer Options.

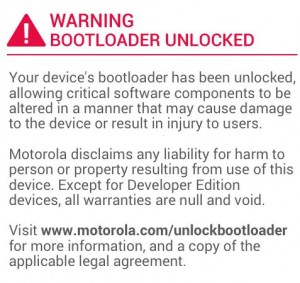
Then we will unlock the bootloader, officially via Motorola unlock support page.
Sign up here, then proceed with 3 steps…

Steps are simple…put your device in fastboot mode (power off, then press the power and volume down buttons simultaneously).
open cmd (with adb & fastboot) and type commands:

Verify that your pc and device are connected by entering the following in the command field:

$ fastboot devices
TA99217J9E fastboot

To get unclock data:
$ fastboot oem get_unlock_data

(bootloader) 9900050809174400#54413939323137
(bootloader) 4A394500585431303936000000#26EE
(bootloader) 8B80D0253F148688B92E922BFE6C218
(bootloader) A472F#495AD10B0B000000000000000
(bootloader) 0000000
OKAY [ 0.062s]
finished. total time: 0.062s

Copy & paste all code without (bootloader), should look like this: (!!!IMPORTANT!!!get rid of all [4] spaces…)
9900050809174400#544139393231374A394500585431303936000000#26EE8B80D0253F148688B92E922BFE6C218A472F#495AD10B0B0000000000000000000000

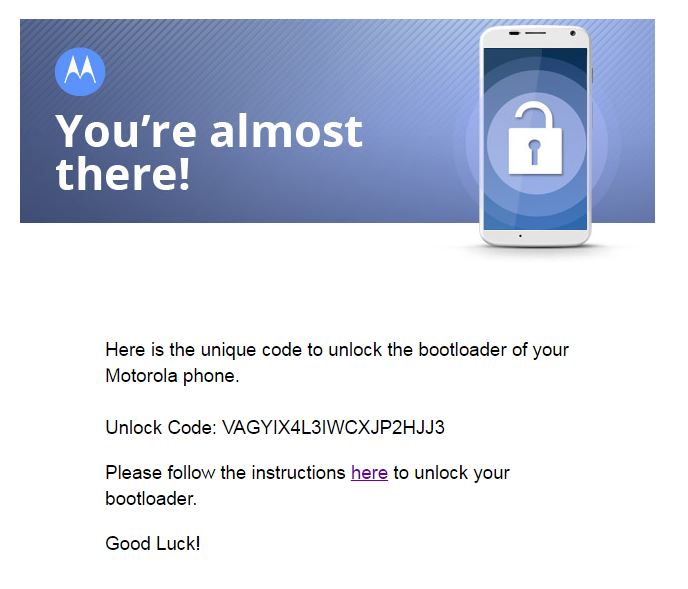
Immediately you will get an email with unlock code:
unlock code

type this to unlock bootloader:
$ fastboot oem unlock VAGYIX4L3IWCXJP2HJJ3

(bootloader) Unlock code = VAGYIX4L3IWCXJP2HJJ3

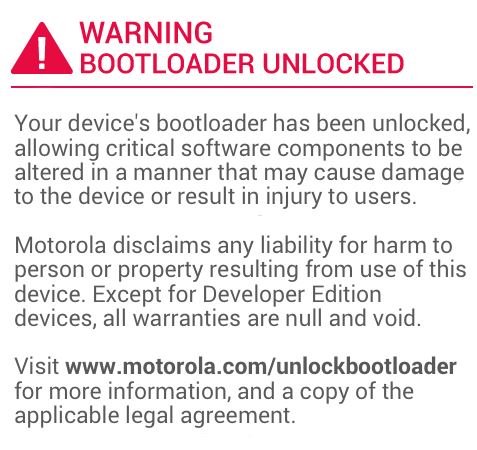
(bootloader) Unlock completed! Wait to reboot

FAILED (status read failed (Too many links))
finished. total time: 17.589s

Ignore FAILED message…:)

you will see such message on the screen:

bootloader_unlocked

Device will reboot and all data will be wiped…

After normal boot again enable Developer Option,USB Debugging;
Transfer BETA-SuperSU-v2.71-20160331103524.zip, we will need it later…
Reboot to fastboot mode again, no need to press the power and volume down buttons…
we can go there with 1 command :)

Verify that device is connected:

$ adb devices
List of devices attached
TA99217J9E device

To reboot to fastboot mode type:
$ adb reboot bootloader

Now after successful bootloader unlock we can flash custom recovery…
at this moment the latest TWRP for Motorola Moto X 2014 is twrp-3.0.0-0-victara.img

$ fastboot flash recovery twrp-3.0.0-0-victara.img
target reported max download size of 536870912 bytes
sending ‘recovery’ (9648 KB)…
OKAY [ 0.346s]
writing ‘recovery’…
OKAY [ 0.216s]

Now it’s overwritten by stock recovery, you could temp boot it by using fastboot boot command:
$ fastboot boot twrp-3.0.0-0-victara.img
downloading ‘boot.img’…
OKAY [ 0.344s]
booting…
OKAY [ 0.251s]
finished. total time: 0.595s

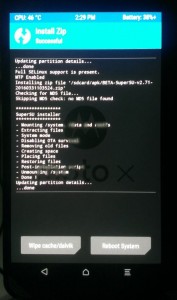
Now you are in TWRP recovery…go to install Zip, choose BETA-SuperSU-v2.71-20160331103524.zip transferred previously & swipe to install then reboot system..

WTRP_SU_INSTALL
After normal boot lets check our root! :)

$ adb shell
shell@victara:/ $ id
id
uid=2000(shell) gid=2000(shell) groups=1003(graphics),1004(input),1007(log),1011(adb),1015(sdcard_rw
),1028(sdcard_r),3001(net_bt_admin),3002(net_bt),3003(inet),3006(net_bw_stats) context=u:r:shell:s0
shell@victara:/ $ su
su
root@victara:/ # id
id
uid=0(root) gid=0(root) context=u:r:init:s0
root@victara:/ #

Done…

# date
Fri Apr  1 09:59:23 AZT 2016

GUS

[email protected]

more